Tag Archives: programming

Edx on Debian Stretch

After you clone the Edx repo there you will find a (undocumented) list of packages required to install on Ubuntu:

requirements/system/ubuntu/apt-packages.txt

These packages and others are required for Debian Stretch.  First, install these packages:

sudo apt-get install $(grep -vE "^\s*#" requirements/system/ubuntu/apt-packages.txt   | tr "\n" " ")

And then install these packages:

sudo apt-get install python-scipy python-numpy build-essential python-dev gfortran libfreetype6-dev libjpeg-dev libtiff5-dev zlib1g-dev libpng-dev  libxml2-dev libxslt-dev yui-compressor graphviz libgraphviz-dev graphviz-dev mysql-server libmysqlclient-dev libgeos-dev libreadline7 libreadline7-dev mongodb nodejs mysql-client virtualenvwrapper libgeos-ruby1.8 lynx-cur libxmlsec1-dev swig  libsqlclient-dev libxmlsec1

Like the photo? See a bigger version on Flickr.

Migrate Django 1.4 to 1.11

I thought these rough notes might be useful to anyone migrating from Django 1.4 (and possibly 1.3) to Django 1.11.

Moving from South to Django Migrations

1. Update your settings files:

Remove ‘south’ from your INSTALLED_APPS

2. Remove migrations.

Remove all app/migrations files except for __initi__.py . Remove any *.py[c|o] files.

Make sure there’s no migrations specific code in your app/migrations/__init__.py files

https://docs.djangoproject.com/en/1.7/topics/migrations/

3. Run new Migrations

python manage.py makemigrations;

python manage.py migrate;

Moving from Django 1.3/1.4 -> 1.11

This is a 1.3 app migrated to 1.4 and now is being migrated to 1.11.

Will probably need a new manage.py file. Create a dummy project and copy manage.py over your existing manage.py file or diff the two). Rename your settings directory to match the name of your project. In my case the project is portal, settings renamed to portal.

URLS files:

django.conf.urls.defaults is replaced by django.conf.urls

patterns() is gone, see:

https://docs.djangoproject.com/en/1.11/releases/1.8/#django-conf-urls-patterns

Views

django.views.generic.simple

django.views.generic.simple is gone, removed in 1.5.

Replace django.views.generic.simple.direct_to_template with TemplateView:

from django.views.generic import TemplateView

Shortcuts

from django.shortcuts import RequestContext

Replaced with:

from django.template import RequestContext

Contrib

django.contrib.databrowse is gone. See:

Forms

This error:

django.core.exceptions.ImproperlyConfigured: Creating a ModelForm without either the 'fields' attribute or the 'exclude' attribute is prohibited; form BlahForm needs updating.

Change in Django 1.8. See:

Quick fix is:

fields = '__all__'

But you will need to confirm that you want the form to expose all fields.

Formtools

Removal of django.contrib.formtools:

Is now separate package, install with pip:

pip install django-formtools

Change imports from django.contrib.formtools to formtools. For example:

from django.contrib.formtools.preview import FormPreview

Becomes:

from formtools.preview import FormPreview

Models

model._meta.get_all_field_names() is gone.

See:

https://docs.djangoproject.com/en/1.9/ref/models/meta/#migrating-from-the-old-api

This is verbatim from the docs:

MyModel._meta.get_all_field_names() becomes:

from itertools import chain
list(set(chain.from_iterable(
    (field.name, field.attname) if hasattr(field, 'attname') else (field.name,)
    for field in MyModel._meta.get_fields()
    # For complete backwards compatibility, you may want to exclude
    # GenericForeignKey from the results.
    if not (field.many_to_one and field.related_model is None)
)))

This provides a 100% backwards compatible replacement, ensuring that both field names and attribute names ForeignKeys are included, but fields associated with GenericForeignKeys are not. A simpler version would be:

[f.name for f in MyModel._meta.get_fields()]

While this isn’t 100% backwards compatible, it may be sufficient in many situations.

Commands

BaseCommand

BaseCommand.option_list is gone.

See https://docs.djangoproject.com/en/1.11/releases/1.8/#extending-management-command-arguments-through-command-option-list .

Arguments

See here for how to add arguments:

https://docs.djangoproject.com/en/1.11/howto/custom-management-commands/#accepting-optional-arguments

These custom options can be added in the add_arguments() method like this:

class Command(BaseCommand):

    def add_arguments(self, parser):

        # Positional arguments

        parser.add_argument(‘poll_id’, nargs=‘+’, type=int)

        # Named (optional) arguments

        parser.add_argument(

            ‘–delete’,

            action=‘store_true’,

            dest=‘delete’,

            default=False,

            help=‘Delete poll instead of closing it’,

        )

Move from MySQL to Postgres

Bigger or more complex databases may want to do a manual migration where the database is migration using django models.

https://www.calazan.com/migrating-django-app-from-mysql-to-postgresql/

I’ll update this as I have time.
django.db.utils.DataError: invalid value for parameter “TimeZone”

If your Django Apps throws this error:

    cursor.execute(self.ops.set_time_zone_sql(), [tz])

django.db.utils.DataError: invalid value for parameter "TimeZone": "America/New_York"

The problem is that your Database and Django app are set to use different timezones.

Search your Django settings files for this:

TIME_ZONE =

And then connect to your database and query for the timezone. In Postgres run this query:

show timezone;

The fix is to have your Database and Django app use the same time zone. The quickest fix is to set TIME_ZONE in your Django app to be the same as your Database.

Install Oracle SQL Developer on Ubuntu Karmic & Lucid

If you want to install Oracle’s SQL Developer on Ubuntu (or another DEB based system such as Debian) you can do one of the following:

  1. Download the RPM package and install using rpm (not advisable).
  2. Download the RPM package and convert to a DEB package using alien
  3. Download the ZIP file titled “Oracle SQL Developer for other platforms” and manually install
  4. Use the make-sqldeveloper-package to convert the ZIP file into a DEB package

I used the make-sqldeveloper-package, which is available for Debian and Ubuntu and it’s derivatives. However, the man page and the instructions are little unclear on how to use it. You need to download the zip file available at Oracle’s (and not the RPM file nor any of the other packages) and then use the make-sqldeveloper-package to convert it to a DEB which you can then install using the dpkg command.

This is preferable to using rpm or alien as you can more easily manage the package using Debian’s and Ubuntu package management tools, plus it will integrate SQL Developer into Gnome’s Menu System . Plus, when Oracle updates their version you can use make-sqldeveloper-package to create an updated DEB package and easily update the version you have installed. The procedure outlined below works on Ubuntu Karmic and should also work on any Debian version that has the make-sqldeveloper-package.

As the man page states:

This utility will require you to download the “Oracle  SQL  Developer  for  other  platforms”  archive  from  <http://otn.oracle.com/software/prod‐ucts/sql/> to create the Debian package from.

1. Download the ZIP file from Oracle’s site

You will need to accept Oracle’s license agreement and download the ZIP file, titled “Oracle SQL Developer for other platforms”, from:

http://www.oracle.com/technology/software/products/sql/index.html

2. Install the make-sqldeveloper-package package

sudo apt-get install sqldeveloper-package

You will need Ubuntu’s multiverse software repository. See the instructions on how to do so.

2.a. Install the tofrodos package

sudo apt-get install tofrodos

Create symbolic links to the tofrodos commands to allow the sqldeveloper-package to work:

sudo ln -s /usr/bin/fromdos /usr/bin/dos2unix
sudo ln -s /usr/bin/todos /usr/bin/unix2dos

Thanks to Miles for the tofrodos tip.

3. Convert the ZIP file to .DEB package

The format of the command is:

make-sqldeveloper-package -b BUILD_LOCATION LOCATION_OF_ZIP_FILE

In my example, I’m going to use /tmp/ORA as the build location and the ZIP file has been download to my Desktop (~Desktop).

make-sqldeveloper-package -b /tmp/ORA/ ~/Desktop/sqldeveloper-2.1.0.63.73-no-jre.zip

The command will create the build directory and remove it when the command finishes. If the command completes successfully you’ll see the following output after a minute or two:

make-sqldeveloper-package: Building sqldeveloper package in "/tmp".

The DEB file will be created in the current directory. In my example I had changed directories to /tmp and that’s where the DEB file will be:

/tmp/sqldeveloper_2.1.0.63.73+0.2.3-1_all.deb

See the man page for more information about the tool:

man make-sqldeveloper-package

4. Install the package

sudo dpkg -i sqldeveloper_2.1.0.63.73+0.2.3-1_all.deb

5. Run SQL Developer

After installing there should he an entry in Gnome’s menu to start the SQL Developer. It’s located under:

Applications->Programming->SQL Developer

Note: You will need a JVM installed for the tool to run.

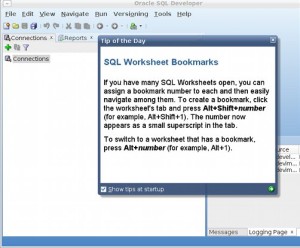
Obligatory Screen Shot:

Oracle SQL Developer

Updated September 27th 2010. Added instructions from Miles on installing dos2unix alternative for Ubuntu Lucid. The dos2unix command is not available in Ubuntu Lucid.

Emacs and tilde files

By default Emacs saves a copy of the previous version of a file you are editing in the same directory as where the original file is located. It saves a copy with ~ appended to the end of the name. ~ is pronounced tilde. However, some tools and programming environments don’t know how to handle these tilde files and this can cause various problems. Someone mentioned on the Boston Ruby list that “Rails 2.3 router picked up emacs tilde ~ file before *.erb.html file …“. And the solution is pretty easy, you just tell emacs to save the ~ files in a different directory:
http://amitp.blogspot.com/2007/03/emacs-move-autosave-and-backup-files.html

Now I wonder is there a way to have it only do this for certain types of files, or only to do it for certain workspaces, that way if I’m edit a file in a directory named ruby it will save the files elsewhere, otherwise save the file in the CWD.

Rails for Eclipse!

Aha! There is RoR support for Eclipse, via Aptana. I’ve just installed it and the instructions are a bit cryptic. Basically you have to install Aptana first (you can do this as an Eclipse plug-in). Then restart Eclipse and then install the Rails plugin called RadRails. Aptana also has Python and PHP support.

Install Aptana:

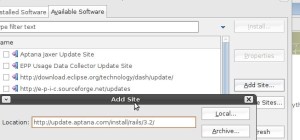
In Eclipse click on Help->Software Updates. Then click on the Available Software tab, then click on Add Site and paste this URL into the Dialog Box that opens:
http://update.aptana.com/install/3.2/

Eclipse Aptana Install Dialog

Install Aptana, then restart Eclipse. Aptana will then prompt you to install the Subversion plugin, then restart.

When Eclipse restarts following the same procedure as above, except add the following site for Rails support:
http://update.aptana.com/install/rails/3.2/

And restart Eclipse. Aptanta may prompt for further plugins, some of which are from their Professional version which will only work for 60 days.

This works with Eclipse 3.4, and should work on 3.3 and 3.2.

IBM shows how to use RadRails:

http://www.ibm.com/developerworks/opensource/library/os-ecl-radrails/

Complete install instructions:

http://ubuntumagnet.com/2008/01/installing-eclipse-radrails-and-subclipse-under-ubuntu-710-gutsy-gibbon

Netbeans 6.5, with Ruby on Rails & JMaki

While writing some RoR code at home (or at least trying to grok the RoR way) I’ve alternating between using Emacs & Netbeans 6.5. Emacs is one true editor to rule them all, but what it’s lacking is code completion such as in Netbeans.

I was working on test RoR project last night with Emacs, and after a couple of hours imported the project into Netbeans 6.1 (a painless process). When I opened the “.erb” file I had been editing in Emacs, I noticed a panel on the right side of Netbeans titled “Palette”, that allows easy creation of html items such as tables & lists. It also, includes JMaki support for Dojo, Yahoo’s YUI, Scriptaculous, Spry, & JQuery, which allows quick and easy insertion of Ajax features using JMaki. After about 5 minutes of mucking around with various Ajax tables, I was easily able to replace a basic HTML table with a prettier, sortable, Yahoo YUI, Dojo, or JQuery tables.

Here’s a rough example, showing the difference between an list, and a sortable Yahoo YUI table created with Netbeans & JMaki:

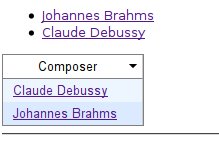
Sample Tables

This is fairly powerful, and for those inexperienced with Ajax provides a quick and simple way to add Ajax features to a web-page or application as it provides Ruby constructs to create the necessary JavaScript and encapsulates the programmer away from the JavaScript. On the other hand, if your an “ace Ajax guru” this doesn’t allow you to directly write and access JavaScript, and the abstraction might seem like an hindrance.

Here’s a quickie overview showing how to use the JMaki features using a 6.1 beta and Ruby on Rails:

http://blogs.sun.com/arungupta/entry/jmaki_on_rails_reloaded_for

And a more recent generic overview using 6.1 & standard HTML/JSP:

http://www.netbeans.org/kb/docs/web/ajax-jmaki-quickstart.html

What’s also useful, is that JMaki in Netbeans creates the same looking code on your HTML rendering page, which means that if you can create JMaki widgets using Java you can easily do the same with RoR, and presumably with PHP.

If your haven’t looked at Netbeans 6.1 or haven’t tried Netbeans in a while, I do think there are some really useful features that sometime give it the edge over it main competitor Eclipse. I use both IDE’s regularly, and prefer Eclipse for Java & Perl development, but for RoR (especially on Linux) and Ajax features I think Netbeans is the winner (for now). However, there is a JMaki plugin for Eclipse which I haven’t tried that might be comparable (for Java applications).

Using both IDE’s could be a useful addition to a programmer’s toolbox. What I must do next is test Netbeans with a J2EE project created under Eclipse and see if I can use both IDE’s on the same project without problems. It be interesting to see if I can edit the Java code with Eclipse and then modify the view and add JavaScript/Ajax feature with Netbeans.

More information about JMaki can be found at:

https://ajax.dev.java.net/

Updated: Fixed version number, it’s Netbeans 6.5 and not 6.1. Fixed typos from writing tooo fast.

Enable mod_perl on Debian, Ubuntu, & Other Linuxes.

To enable mod_perl with Apache2 on Debian & Ubuntu for all directories served up by Apache2, including user directories such as ~/public_html, add the following lines to /etc/apache2/sites-available/default

# enable mod_perl
    <Files ~ ".(pl|cgi)$">
           SetHandler perl-script
           PerlResponseHandler ModPerl::Registry
           Options +ExecCGI
           PerlSendHeader On
    </Files>

In a real production environment you probably don’t want to enable this for all directories that Apache2 serves up, but only from those directories you expect to run perl in.

Thanks to this thread on the Ubuntu Forums for the info.

Titled updated as per Ozkar’s suggestion.

Netbeans 6.5 on Debian

Doesn’t perform badly, I’ve been using it recently with Ruby code, and I like how it colourises the code to make editing code easier, and performs it auto-completion and method lookup (basically all the features you’d expect with a modern IDE).

It’s does’t startup as fast as using Emacs, or vi, but I find the features very handy and very convenient. It doesn’t look  bad either. It runs better on my PC at home running Debian Linux than it does on my PC at work running WinXP. This is probably because I’m using a 1.5 JVM on WinXP and a 1.6 JVM on Debian. Running on 1.6 JVM’s means that Netbeans will automatically use anti-aliased fonts if you have anti-aliased fonts enabled (much easier on the eyes if your using a LCD screen).

XSLT & 1.5 JVM’s

Oh bugger!

[junitreport] ERROR: ‘Unrecognized XSLTC extension ‘org.apache.xalan.lib.Redirect:write”

BUILD FAILED

Errors while applying transformations: java.lang.RuntimeException: Unrecognized XSLTC extension ‘org.apache.xalan.lib.Redirect:write’

See http://stefan.samaflost.de/blog/2004/10/29#XSLTC.

Basically, if your using XSLT transformations with a 1.4 JVM and upgrade to a 1.5 JVM, you will get errors because 1.5 JVMs use a different XSLTC transformer.

You can either try and force your build to use Xalan-J, instead of the one packaged with the 1.5 JVM. Or, change the namespace used:

From, for example:

xmlns:redirect=”org.apache.xalan.lib.Redirect”

to

xmlns:redirect=”http://xml.apache.org/xalan/redirect